ClickPay SDK
ClickPay SDK makes the integration with ClickPay payment gateway very easy by providing ready made payment screen that handles the card entry and billing & shipping info and complete the missing details.
Features
- The SDk offers a ready-made card payment screen.
- Card Scanner for quick & easy entry of card details (iOS 13.0+).
- Handle the missing required billing and shipping details.
- Logo, colors, and fonts become easy to be customized.
- Apple Pay supported.
- The SDK size became very light because we removed all the third-party dependencies.
- Supporting dark mode.
Requirements
- iOS 10.0+
- Xcode 10.0+
- Create a ClickPay merchant account relative to your country.
Installation
CocoaPods
CocoaPods is a dependency manager for Cocoa projects. For usage and installation instructions, visit their website. To integrate ClickPay SDK into your Xcode project using CocoaPods, specify it in your
Podfile:
pod 'ClickPay', '~> 6.4.2'Carthage
Carthage is a decentralized dependency manager that builds your dependencies and provides you with binary frameworks. To integrate ClickPay SDK into your Xcode project using Carthage, specify it in your
Cartfile:
github "clickpaysa/clickpay-ios-library-sample" ~> 6.4.2
Swift Package Manager
The Swift Package Manager is a tool for automating the distribution of Swift code and is integrated into the swift compiler.
Once you have your Swift package set up, adding ClickPaySDK as a dependency is as easy as adding it to the dependencies value of your Package.swift.
dependencies: [
          .package(url: "https://github.com/clickpaysa/clickpay-ios-library-sample.git", .upToNextMajor(from: "6.3.2"))
]
Manual
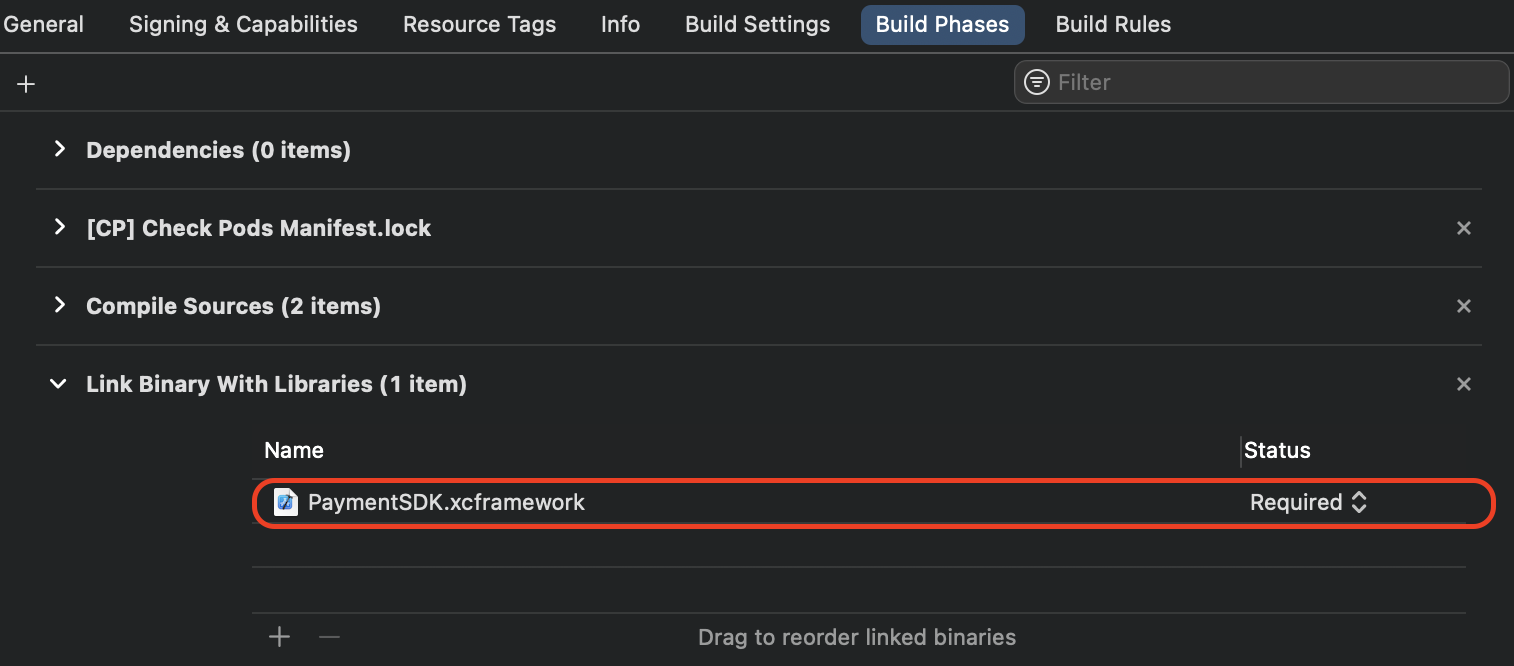
Follow the below steps:
- Download the framework.
- Navigate to
Generalsection of yourTarget. - Drag
PaymentSDK.xcframeworkfile toFrameworks, Libraries, and Embedded Contentsection.
Prerequisites
Before starting the integrations with ClickPay SDK you should check the Prerequisites below:
- To give Card Scanner the access permission to the camera, you should add the following key & value to your app
info.plistfile.
<key>NSCameraUsageDescription</key>
<string>Write here your message to the user</string>
Usage
Import the PaymentSDK in your code
import PaymentSDKPay with Card
- Configure the billing & shipping info, the shipping info is optional
let billingDetails = PaymentSDKBillingDetails(name: "John Smith",
                                            email: "email@test.com",
                                            phone: "+96611111111",
                                            addressLine: "address",
                                            city: "Dubai",
                                           state: "Dubai",
                                           countryCode: "ae", // ISO alpha 2
                                           zip: "12345")

let shippingDetails = PaymentSDKShippingDetails(name: "John Smith",
                                            email: "email@test.com",
                                            phone: "+96611111111",
                                            addressLine: "address",
                                            city: "Dubai",
                                           state: "Dubai",
                                           countryCode: "ae", // ISO alpha 2
                                           zip: "12345")
- Create object of
PaymentSDKConfigurationand fill it with your credentials and payment details.
let configuration = PaymentSDKConfiguration(profileID: "profile id",
                                       serverKey: "server key",
                                       clientKey: "client key",
                                       currency: "SAR",
                                       amount: 5.0,
                                       merchantCountryCode: "SA")
            .cartDescription("Flowers")
            .cartID("1234")
            .screenTitle("Pay with Card")
            .billingDetails(billingDetails)
- You are now ready to start payment and handle
PaymentManagerDelegate
- For normal card payment use:
PaymentManager.startCardPayment(on: self,
                             configuration: configuration,
                             delegate: self)
For tokenized payment use:
 PaymentManager.startTokenizedCardPayment(on: self,
                          configuration: configuration,
                          token: *token*,
                          transactionRef: *transactionReference*
                          delegate: self)
For tokenized payment with 3DS feature enabled (request CVV) use:
 PaymentManager.start3DSecureTokenizedCardPayment(on: self,
                          configuration: configuration,
                          savedCardInfo: SavedCardInfo,
                          token: *token*
                          delegate: self)
For payment with the ability to let SDK save Cards on your behalf and show sheet of saved cards for user to choose from. use:
 PaymentManager.startPaymentWithSavedCards(on: self,
                          configuration: configuration,
                          support3DS: true,
                          delegate: self)
Pay with Apple Pay
Follow the guide Steps to configure Apple Pay to learn how to configure ApplePay with ClickPay.
Do the steps 1 and 2 from Pay with Card although you can ignore Billing & Shipping details and Apple Pay will handle it, also you must pass the merchant name and merchant identifier parameters.
let configuration = PaymentSDKConfiguration(profileID: profileID,
                                       serverKey: serverKey,
                                       clientKey: clientKey,
                                       currency: "SAR",
                                       amount: 5.0,
                                       merchantCountryCode: "SA")
            .cartDescription("Flowers")
            .cartID("1234")
            .screenTitle("Pay with Card")
            .merchantName("Flowers Store")
            .merchantAppleBundleID("merchant.com.bundleID")
            .simplifyApplePayValidation(true)
To force ApplePay validation on all user's billing info, pass forceApplePayValidation parameter in the configuration with true.
Call
startApplePayPaymentto start payment
PaymentManager.startApplePayPayment(on: self,
                             configuration: configuration,
                             delegate: self)
Pay with Alternative Payment Methods
It becomes easy to integrate with other payment methods like STCPay to serve a large sector of customers.
- Do the steps 1 and 2 from Pay with Card
- Choose one or more of the payment methods you want to support
configuration.alternativePaymentMethods = [.stcPay]- Call
startAlternativePaymentMethodto start payment
PaymentManager.startAlternativePaymentMethod(on: self,
                             configuration: configuration,
                             delegate: self)
Delegates
Here you will receive the transaction details and errors.
extension ViewController: PaymentManagerDelegate {
    func paymentManager(didFinishTransaction transactionDetails: PaymentSDKTransactionDetails?, error: Error?) {
        if let transactionDetails = transactionDetails {
            print("Response Code: " + (transactionDetails.paymentResult?.responseCode ?? ""))
            print("Result: " + (transactionDetails.paymentResult?.responseMessage ?? ""))
            print("Token: " + (transactionDetails.token ?? ""))
            print("Transaction Reference: " + (transactionDetails.transactionReference ?? ""))
            print("Transaction Time: " + (transactionDetails.paymentResult?.transactionTime ?? "" ))
        } else if let error = error {
            // Handle errors
        }
    }
}
Tokenisation
To enable tokenisation, please follow the below instructions.
- Request token
configuration.tokeniseType = .userOptinoal // read more about the tokeniseType in the enums section
configuration.tokenFormat = .hex32 // read more about the tokenFormat in the enums section
After passing those parameters, you will receive token and transaction reference in the delegate, save them for future usage.
- Pass the token & transaction reference
configuration.token = token
configuration.transactionReference = transactionreference
Theme
Use the following guide to cusomize the colors, font, and logo by configuring the theme and pass it to the payment configuration.

Localization
You can use the strings file below to copy the key and add it to your app localizable file and overwrite the value to yours.
Enums
Those enums will help you in customizing your configuration.
- Tokenise types
The default type is none
public enum TokeniseType: Int, Codable {
    case none // tokenise is off
    case merchantMandatory // tokenise is forced
    case userMandatory // tokenise is forced as per user approval
    case userOptinoal // tokenise if optional as per user approval
}- Token formats
The default format is hex32
public enum TokenFormat: String {
    case none = "1"
    case hex32 = "2"
    case alphaNum20 = "3"
    case digit22 = "4"
    case digit16 = "5"
    case alphaNum32 = "6"
}- Transaction types
The default type is sale
public enum TransactionType: String, CaseIterable {
    case sale
    case authorize = "auth"
}configuration.transactionType = .sale- Alternative Payment Methods
public enum AlternativePaymentMethod: String {
    case stcPay = "stcpay"
}configuration.transactionType = .saleDemo application
Check our complete example.
